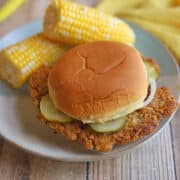
Vegan fried pork tenderloin sandwich (Midwest classic)
This Midwestern classic has been reimagined! This full-flavored chickpea tenderloin is breaded in saltine crackers, and fried until perfectly golden brown and crispy. Then it's piled on a bun with pickles, onions, and mustard for a comforting and nostalgic bite.
Servings: 6 people
Calories: 385kcal
Ingredients
For vegan pork tenderloins
- 1 sleeve saltine crackers about 35 to 40 crackers
- Few dashes of black pepper
- 1 (15.5-ounce) can chickpeas fully drained
- 1 garlic clove minced
- 1 cup vital wheat gluten
- 1 cup panko breadcrumbs
- 1 teaspoon dried thyme
- ¾ teaspoon dried rosemary
- 1 teaspoon paprika
- 2 Tablespoons avocado oil plus more for frying
- ½ cup water
- ½ teaspoon Better Than Bouillon, no chicken base
- ¼ cup tamari
- ¼ teaspoon liquid smoke
- ½ cup non-dairy milk
- 1 teaspoon cornstarch
For sandwiches
- 6 burger buns warmed
- ¼ cup mustard stoneground or yellow
- 12 pickle planks
- ½ onion sliced thin into rings
Instructions
To make vegan pork tenderloins
- Put all of the saltine crackers from one sleeve (35 to 40 crackers) into a food processor. Pulse or combine on low until the crackers have the texture of breadcrumbs. (If you don't have a food processor, put the crackers in a freezer bag, remove air, seal, and then crush with a rolling pin until they have a breadcrumb texture.)
- Once they're broken into small crumbs, move the crushed saltines to a dinner plate, and toss with a few dashes of black pepper. Then set aside.
- Add drained chickpeas to the food processor along with a minced clove of garlic. Pulse 2 or 3 times until the chickpeas are just broken up and chunky. You want them to be the texture of chickpea tuna salad, not hummus.(If you don't have a food processor, you can crush the chickpeas in a bowl with a fork or potato masher.)
- Add the chickpeas and garlic to a large mixing bowl along with vital wheat gluten, panko breadcrumbs, dried thyme, dried rosemary (crush with your fingers as you add it), and paprika. Stir with a spoon to fully combine.
- In a medium-sized bowl, combine 2 Tablespoons avocado oil, water, Better Than Bouillon no chicken base, tamari, and liquid smoke. Stir with a fork or whisk until everything is fully combined and the bouillon has dissolved. (If you'd rather, you can replace the water & bouillon with ½ cup vegetable broth instead.)
- Add the liquid ingredients from the medium-sized bowl into the mixing bowl with the dry ingredients. Combine by stirring with a spoon. Then once it becomes a dough, start using your hands to knead the dough and combine everything, making sure to get any dry flour from the sides of the bowl. Continue kneading for a few minutes, until you see strings of gluten forming in the dough.
- Break the dough apart into 6 equal-sized portions, knead each one, and shape into balls.* Then smash each one on a cutting board using your fingertips and palm of your hand. They should be thinner than a burger patty, about ¼ inch thick. (If you see any holes in the dough, they're too thin. Re-form a ball, and try again.)
- Once all of the dough has been formed into thin patties, make a dredging station. In a shallow bowl, combine non-dairy milk with cornstarch using a fork or whisk, until there are no lumps. Get the plate with crushed saltines, along with a couple of empty plates for the breaded vegan tenderloins.
- Now it's time to dredge them. Dip each flattened "loin" into the milk mixture. Let any excess liquid drip off so that it doesn't make the saltines wet. Then dredge the "loin" in the saltine coating, covering each side fully. Use your hands to make sure the saltines fully coat every part, even pressing into it lightly, if necessary. (If you find that your "loin" tears or comes apart in the milk mixture, that means it was pressed too thin. You can fix it by pressing the dough back together with your fingers, and even using some of the saltine crumbs as binding to hold it together.)
- Once all of the vegan tenderloins are breaded, put a shallow layer of oil into a skillet, and bring to a medium high heat. DON'T PUT IN SO MUCH OIL THAT IT COVERS THE TENDERLOINS. They fry nicer and don't get oil-logged if the oil isn't too high. The oil should only come about halfway up the "loin." (The vegan tenderloins are large and need a lot of room to fry and be flipped. If you have a very large skillet, you may be able to fry two at a time. However, I prefer to use one or two small skillets, and just plan on cooking one at a time. It's your call.)
- Fry each tenderloin until fully browned on both sides, about 4 minutes per side. Cover the skillet with a lid as it cooks, so that the tenderloin can get completely done inside. Once it's dark golden brown on both sides, move it to a lined plate or wire rack to drain. Repeat until all of the vegan tenderloins are fried, and add more oil to the skillet, as needed.
To compile sandwiches
- Slather burger buns with a thin layer of mustard. Add vegan tenderloins, and garnish with pickles and sliced onion. Serve while hot.
Notes
*If you want comically large tenderloins that shoot way past the bun, you can break them into 5 portions. If you want smaller tenderloins, break them into 7 portions. (Obviously, you'll need to increase/decrease the amount of buns accordingly.)
Keep leftover vegan tenderloins in a covered container in the refrigerator. They will last for about 4 days. Reheat in a single layer in the air fryer at 390 degrees for about 8 minutes or until warmed and crispy.
To freeze, put the fried vegan tenderloins into a freezer-safe container or freezer bag with parchment between each one. They will keep for 3 to 6 months.
Note on nutrition info: Nutrition values are estimates and do not include the frying oil, as the amount absorbed can vary depending on frying time, temperature, and method.
Nutrition
Calories: 385kcal | Carbohydrates: 49g | Protein: 25g | Fat: 10g | Saturated Fat: 1g | Polyunsaturated Fat: 2g | Monounsaturated Fat: 4g | Trans Fat: 0.002g | Sodium: 1274mg | Potassium: 225mg | Fiber: 2g | Sugar: 5g | Vitamin A: 285IU | Vitamin C: 3mg | Calcium: 160mg | Iron: 5mg
