
Quick pickled green garlic has a mild, garlicky flavor that doesn’t overwhelm. When soaked in a simple brine, green garlic picks up the tangy flavors like a dream.
It’s great for adding a pop of acid and crunch to sandwiches, salads, and bowls.
With just four ingredients, pickled green garlic is easy to make, and requires only 15 minutes of hands-on time. Whip up a batch, and extend the flavors of spring in your refrigerator.

Something I love about my CSA (a farm subscription) or the farmers market is finding veggies I never see in stores.
One perfect example – green garlic.
The first time I got it in my farm share, I wasn’t sure what to do with it. But once I started quick pickling it, I was obsessed.
I added those briny slices to everything – from morning avocado toast to nachos, chili dogs, salads, and bowls – for crunch and garlicky bite.
When I got green garlic again this year, I knew just what to do, and quickly made a beeline for the vinegar.
In this post:
What is green garlic?

Also known as spring garlic, this seasonal vegetable is available from March to June.
Unlike the mature bulbs found in grocery stores, green garlic is harvested early – before it divides into cloves. It’s taken from the ground while it’s still tender and mild with a lighter garlic flavor.
While it looks and tastes a little different, green garlic can be used much the same way as regular garlic. You can cook it, leave it raw, or include it anywhere that you might have used garlic, onions, or leeks.
When green garlic is in season, I’ll often use it in the mirepoix for soups, or throw it into my vegetable stir-fry. However, my absolute favorite way to use it is quick pickling.
Ingredients
Here are the ingredients you will need to make this recipe.

Salt: Use non-iodized sea salt or kosher salt.
White vinegar: Look for white vinegar near the other vinegars in the center aisles of the grocery store. If you prefer, it can be replaced in part or in whole with white wine vinegar, rice vinegar, or apple cider vinegar.
Green garlic: Look for it at the farmers market or from your CSA (Community Supported Agriculture). It has an appearance that’s similar to leeks or green onion with a bright green stalk and small white bulb.
You can use the entire stalk – from white bulb to green tops. (Just skip the sprouts at the end.)
Easy step by step instructions
This section shows how to make this recipe at a glance with process photos of the steps. For complete ingredient amounts & instructions, keep scrolling to the recipe card below.

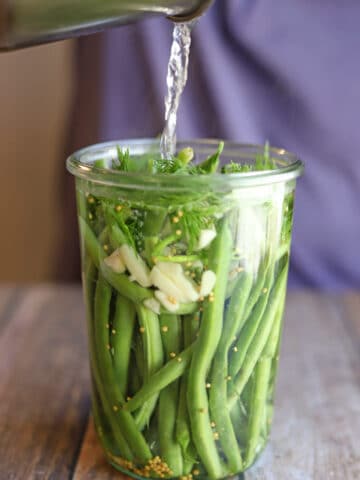
1. Put water and salt into a pot. Bring it to a medium heat, and stir until the salt dissolves. Turn off the heat, add white vinegar, and stir to combine. Then set aside.
2. Cut the root ends off of the green garlic with a sharp knife. Then thinly slice the vegetable – from white part at the bottom all the way to the bright green tops.
3. Add the sliced pieces to a clean jar.
4. Pour the vinegar solution over it. If necessary, press the slices down with a fork, so that they're completely submerged in the pickling liquid, and cover the jar with a lid.
Once the pickling brine has cooled to room temperature, move the jar to the refrigerator.
Tip: Depending on the size of your green garlic, you may have brine leftover. If you do, use it to make pickled jalapenos.
The pickled green garlic will be ready to eat the next day. However, the longer it marinates in the brine, the more flavorful and tender it becomes.
Make it your own
You can make this easy recipe your own by adding flavorful ingredients or varying the vinegar.
Here are some ways to personalize this recipe:
- Replace some or all of the white vinegar with apple cider vinegar, white wine vinegar, or rice vinegar
- For a little sweetness, add a Tablespoon or two of sugar
- Include flavorful add-ins to the jar like whole peppercorns, mustard seeds, coriander seeds, bay leaves, or fresh herbs like dill
- To make it spicy, add a thinly sliced jalapeño or red pepper flakes
Serving ideas

There are so many ways to use this quick pickled vegetable – from topping avocado toast to adorning a platter of nachos with cashew queso.
It’s also a great addition to vegan cheese boards!
Here are more ideas:
- Use it as a topping on soy chorizo tacos or refried bean quesadillas
- Add it to sandwiches and wraps like a vegan banh mi or vegan chili dogs
- Sprinkle it on top of Soy Curls chili or vegan tortilla soup
- Pile it on salads like a chef salad or taco salad
- Throw it on bowls like a falafel bowl or hummus bowl
If there’s a dish that you usually top with raw onions, try it with pickled green garlic instead!

Storage instructions
Store jarred pickled green garlic in the refrigerator, making sure it stays fully submerged in the brine.
It will last for roughly 2 to 3 weeks in the refrigerator.
To make it last as long as possible, always use a clean fork when removing the pickled slices from the jar.
FAQ
Green garlic is a young garlic plant. If left to grow, it would become standard garlic bulbs. Farmers cull green garlic to aid the bulb growth of the remaining garlic plants.
With the exception of the roots at the bottom, all of the green garlic is edible – from the white bulb to the green tops.
Sometimes the tops can be a little fibrous. So taste yours before pickling, and if you find the tippy tops to be too chewy, discard them.
No. Although they look similar and even belong to the same genus (allium), they're not the same plant.
No, green garlic and garlic scapes are not the same thing.
Green garlic looks similar to leeks or spring onions. It’s harvested young, while the bulbs are still developing.
Garlic scapes look similar to long, thin green beans. They are the flowering stalks of mature garlic.
No, this is a quick pickling recipe, which means the green garlic has to be stored in brine in the refrigerator. Canning for long term storage is outside of my wheelhouse.
CSA stands for Community Supported Agriculture. It’s a way of supporting your local farmers by purchasing a share of their harvest in advance, which helps them to pay for start-up costs for the season.
As their produce ripens, members get a share of whatever is ready to eat, often in the form of a weekly box. This continues throughout the summer and even into fall.
Learn more about CSA programs on Wikipedia.

If you try this recipe and love it, let me know! Leave a comment and ⭐⭐⭐⭐⭐ rating in the comment section below. It truly makes my day and is such a help!
📖 Recipe

Quick pickled green garlic (4 ingredients!)
Ingredients
- 1 cup water
- 2 Tablespoons sea salt or kosher salt (not iodized)
- 1 cup white vinegar
- 4 stalks green garlic (or more, depending on size)
Instructions
- Fill a small to medium sized pot with water and salt. Bring to a medium heat and stir until the salt dissolves. Once it has fully dissolved, turn off the heat. (This generally takes 2 or 3 minutes.)
- Add white vinegar to the pot, and stir to combine. Set aside to cool slightly.
- Trim the root ends from the green garlic, and thinly slice from the white bulb up to the green tops.
- Add the slices to a clean jar. Then carefully pour the vinegar solution over it. Make sure the slices are totally submerged, and cover the jar with a lid. Once the pickling brine has cooled to room temperature, move the jar to the refrigerator.
- The pickled green garlic will be ready to eat the next day, but it will taste even better as the days pass. Store in the refrigerator until you're ready to eat it.


Leave a Reply